Graphical Applications with WebVNC
While many of the applications that run on ZIH systems are used from the command line, graphical user interfaces are sometimes beneficial for particular use cases. In order to simplify the setup, few solutions are available, which are described in the following.
The solutions provided here are based on a Singularity container with a VNC setup that can be used as an alternative to SSH's X-Forwarding option to start graphical applications.
Internally, the solution utilizes noVNC to offer a web-based client that you can use with your browser, so there's no additional client software necessary.
Access via JupyterHub
Check out our new documentation about Virtual Desktops.
To start a JupyterHub session on the cluster vis with one CPU
cores and 1,5 GB memory per core, click on:
Optionally, you can modify many different Slurm parameters. For this, follow the general JupyterHub documentation.
Your browser should load JupyterLab, which looks like this:
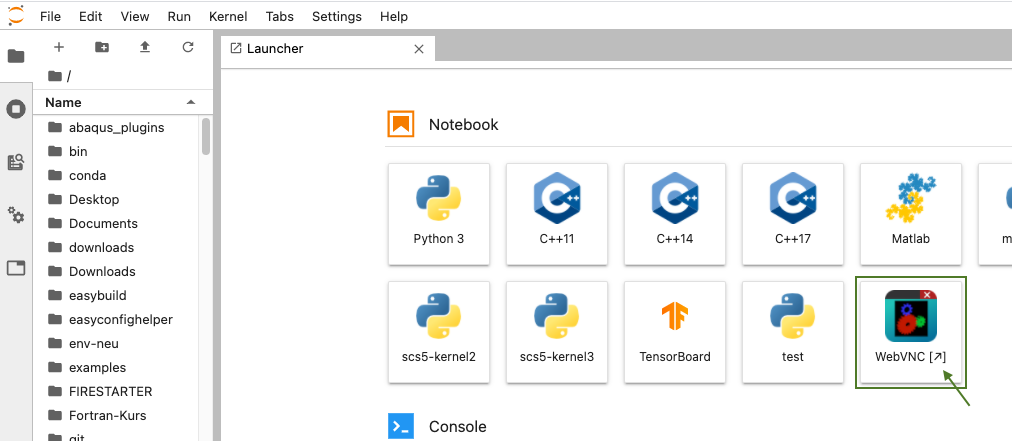
Click on the WebVNC button. A new tab with the noVNC client will be opened.
Access via terminal
Step 1
Start the runVNC script in our prepared container in an interactive batch job (here with 2 cores
and 1,5 GB of memory per core):
marie@login$ srun --pty --mem-per-cpu=1536 --cpus-per-task=2 --time=4:00:00 singularity exec /scratch/singularity/xfce.sif runVNC
[...]
Of course, you can adjust the batch job parameters to your liking. Note that the default time limit
in cluster vis is only 1 hour, so you should specify a longer one with --time (or -t).
The script will automatically generate a self-signed SSL certificate and place it in your home
directory under the name self.pem. This path can be overridden via the parameter --cert to
runVNC.
On success, it will give you an URL and a one-time password:
[...]
Note: Certificate file /home/user/self.pem already exists. Skipping generation.  Starting VNC
server...  Server started successfully.  Please browse to: https://172.24.146.46:5901/vnc.html
The one-time password is: 71149997
Step 2
Direct access to the compute nodes is not allowed. Therefore, you have to create a tunnel from your laptop or workstation to the specific compute node and port as follows.
marie@local$ ssh -NL <local port>:<compute node>:<remote port> barnard
e.g.
marie@local$ ssh -NL 5901:172.24.146.46:5901 barnard
SSH command
The previous SSH command requires that you have already set up your SSH configuration .
Step 3
Open your local web-browser and connect to the following URL, replacing <local port> with the
local port you specified in the previous step:
https://localhost:<local port>/vnc.html
e.g.
https://localhost:5901/vnc.html
Since you are using a self-signed certificate and the node does not have a public DNS name, your browser will not be able to verify it and you will have to add an exception (via the "Advanced" button).
Step 4
On the website, click the Connect button and enter the one-time password that was previously
displayed in order to authenticate. You will then see an Xfce4 desktop and can start a terminal in
there, where you can use the "ml" or "module" command as usual to load and then run your graphical
applications. Enjoy!
Backlinks
The following pages link to this page: